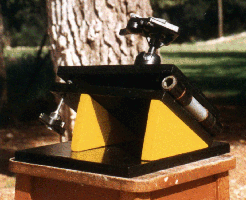
Build an equatorial platform to take pictures of the nightsky, using a mere camera, without a telescope
Which flashlight should I use ?
Any, provided it does not light.
Can I use a stand ?
Yes you can. But photographing the nightsky with a mere camera requires several minute exposures. During that time, the Earth revolves. If the camera does not move, stars leave a track on the film. You would choose this method to make a star-rain on a well-chosen foreground. If you want to have punctual stars on your film, you have to make up for this rotation movement. That is to say, the camera has to follow the sky.
To use this equatorial platform, you need:
![]() a
mechanical camera with a B pause.
a
mechanical camera with a B pause.
![]() a
50 mm focal length objective
a
50 mm focal length objective
If you only have an electronic camera, you had better give it up.
This equatorial platform will give you good results with a 50 mm objective. You can also use shorter focal length objectives. The more the focal length increases, the more visible the pursuit defects are.
Plans


On the color picture, I replaced the axis of the winge by a tube to point the pole star. This home made winge is stronger than a standard winge.
Equipment
![]() 15 mm thick plywood
15 mm thick plywood
![]() A rotule. Do avoid the ones
sold for astronomical applications, they are often more expensive and weaker.
A rotule. Do avoid the ones
sold for astronomical applications, they are often more expensive and weaker.
![]() 2 to 3 mm thick steal sheet,
and steal tube.
2 to 3 mm thick steal sheet,
and steal tube.
![]() 6 mm in diameter threaded
rod
6 mm in diameter threaded
rod
![]() Screws, saw, hammer, drill,
metal saw, sandpaper, paint... A vice would be helpful.
Screws, saw, hammer, drill,
metal saw, sandpaper, paint... A vice would be helpful.
Setting the distance and the diaphragm
Set the distance to infinite. Open the diaphragm as wide as possible (1.7 or 2.8). Most of objectives have an optical defect when the diaphragm is fully opened. It appears on the photo as vignetage: the rims of photos are darker than the center. To avoid this phenomenon, that you may like or not, just close your diaphragm a little more. But when you add a diaphragm, you have to double the exposure time. When you close the diaphragm from 1.7 to 2.8, you have to double the exposure time to have the same amount of light.


NGC 7000 diaphragm 1,7
NGC 7000 diaphragm 2,8
5 minute exposure
10 minute exposure
Ektachrome 1600 Panther
Exposure time
With a 400 ISO film and a 1.7 aperture objective, 5 minutes should be
enough to see the main sky objects. But the brightest stars appear on 15
seconds exposures. The siting errors are responsible for a limited exposure
time. As the quality of the siting is unknown (the axis of the winge is
generally 1° from the pole but it can be closer), the maximum exposure
time can reach 20 minutes. I have never tried such a long exposure but
some of my 10 minute exposures are OK (see above). As films lose their
sensitivity when exposed, there is little difference between a 5 minute
and a 10 minute exposure. Hardly when you can see the difference between
a 10 minute and a 20 minute exposure, except in the background sky.
Good result films
In the beginning, you should choose a slide film. The paper prints made by professional photographers with astronomical negatives are often disappointing because they are not used to this kind of pictures. They will make grey sky background, weird colors... Whereas with slides, the processing is standardized and it is possible to evaluate the quality of the picture in terms of exposure time, diaphragm and colors.
Black and white films are excellent if you print them yourself.
![]() TMAX 400 (black and white
paper )
TMAX 400 (black and white
paper )
![]() Ektachrome 400 Elite (color
slides)
Ektachrome 400 Elite (color
slides)
![]() Ektachrome 1600 Panther (color
slides)
Ektachrome 1600 Panther (color
slides)
Occasionally, film manufacturers change their emulsions. A film that used to be satisfactory as regards the quality of the colors could lose its advantages. Then, you have to find an other one. Would you notice a change in emulsions, please write it to me so that I could update this page.
Some tests have shown that Fuji films made too green nebula and a bluish
or greyish sky background. Moreover, all the stars tend to appear as bright
which makes it difficult to identify constellations.
Directions for use
Keep off any source of light pollution. Point the rotation axis towards the pole star. You just have to aim at it through the pipe. Therefore, putting the equatorial platform on a stool should be helpful. Center the star field you want to photograph and tighten the rotule. Mind not to move the platform when tightening. Start the exposure and the chronometer and start immediately turning clockwise the screw, 1 rpm. You must turn the screw regularly and check the speed every 15 seconds. Installing a small motor will be a great help. Please see how to use a stepper motor.
![]() For each picture, you should
note down the following information: part of the sky, date and time, objective,
exposure time, film, and every commentary which will help you to explain
the quality of the picture.
For each picture, you should
note down the following information: part of the sky, date and time, objective,
exposure time, film, and every commentary which will help you to explain
the quality of the picture.
The results
You will learn, using a map, to photograph the nebula-rich sky regions. Try to identify stars, clusters, nebulae and galaxies.


Sagittarius, Ektachrome 400, 5 min, F/1,7


Cygnus, Ektachrome 1600, 10 min, F/2,8

