How To Make A Telescope 
Astronomy
Equatorial Table
Hydraulic Focussing
Stepper Motor
How To Make A Telescope
Information for Beginners
Links And Bibliography
Gastronomy
Recipe Schematics
Recipes
To Bake A Well-Risen Cake
Links
Photography
Astronomy
Architecture
Animals
Landscape
Crafts
Livroscope
Read Html Books On Screen
High Rise Handlebars Bike
Dominoes
Power Electronics
Heatsink Impedance
Chess

http://queribus.free.fr
1. Why Making A Telescope?
Commercial telescopes are
designed to meet customers' expectations. They demand light and
transportable instruments, as cheap as possible. To meet these
criteria, manufacturers reduce the quality of the mount by making it
light and flimsy. Very good mounts do exist, they are strong and
stable, but their cost is so high that you may want to invest this
money in better optical parts and make the mount yourself.
2. Make Mount or Optics?
Grind a mirror yourself is an
adventure that requires a lot of time and skills. The financial
advantage is not very obvious when you start.
However a simple mount can be much stronger and a lot more stable than what you could buy for the same price. You only need basic woodworking skills.
However a simple mount can be much stronger and a lot more stable than what you could buy for the same price. You only need basic woodworking skills.

Contents
1. Why Making A Telescope?
2. Make Mount or Optics?
3. Technological Choices
3.1 Start with a simple instrument
3.2 Do not copy commercial instruments
3.3 Do not hesitate making it too strong
3.4 Avoid useless settings
3.5 Materials
4. Examples
4.1 Concrete Stand
4.2 Friction of Axles
4.3 Spider
4.4 Barillet
4.5 Hydraulic Eyepiece
5. Personal Experience
3.1 Start with a simple instrument
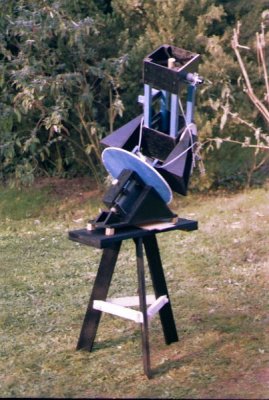
If you are starting astronomy, do not motorize your telescope immediately. To learn how to observe, an altazimutal mount is best because it is easier to make and it will be stronger and more stable than an equatorial mount. Think about assembling and taking apart your scope in the dark and about the risk of damaging or losing parts.
 This
telescope was designed for fast assembly and visual observation only.
The column, fork and optical tube are easy to put together without any
tools.
This
telescope was designed for fast assembly and visual observation only.
The column, fork and optical tube are easy to put together without any
tools.The technologies used by
manufacturers are not available to amateurs. By trying to copy their
solutions, you are taking the risk of making something too complicated,
too expensive and too flimsy. And also the risk of not succeeding.
3.3 Do not hesitate to make something too strong
Always think about oversizing
your telescope. Small parts can be broken during transportation or when
manipulated in the dark. Do not hesitate to make things too strong or
too heavy, that may be the most important piece of advice. The heavier
an instrument is, the less sensitive to vibrations it is.
3.4 Avoid useless settings
An adjustable part is weaker than a fixed part. Most adjustable tripods you find in stores are the example of what not to do.
3.5 Materials
Wood absorbs vibrations better
than steel. It is also easier to work with. For the stand, concrete is
particularly effective to make a stable instrument.
Vibrations
Touching the instrument, hitting your eyebrow against the eyepiece, kicking something because you have not seen where you were walking or a little wind: anything can make your telescope vibrate. Optical amplification only making things worse, the image starts oscillating to a certain frequency during a certain time. This defect is all the more annoying that the frequency is high and damping is long. A good mount damps vibrations in 1 or 2 seconds and its frequency must be around 1 oscillation per second or lower.
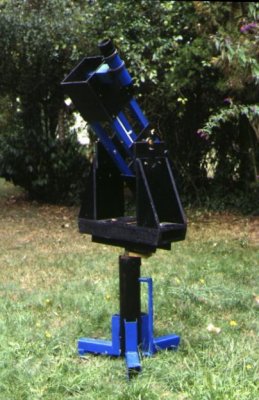
 The concrete block weighs 45 kg, the column, a concrete filled PVC pipe weighs 25 kg. The whole scope reaches 75 kg.
4.1 Concrete Stand
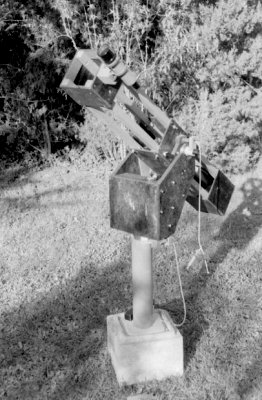
A column stand is mechanically
less stable that a tripod but it is easier to move around, especially
in the dark when you do not see where you step.
I did not have the appropriate tools to make a steel stand, therefore I cast a column of concrete in a PVC pipe. This heavy solution is simple and efficient.
I did not have the appropriate tools to make a steel stand, therefore I cast a column of concrete in a PVC pipe. This heavy solution is simple and efficient.

Drawings of the column stand of the telescope shown above.
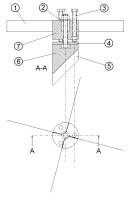
Dobson telescope amateurs use
teflon pads. This is justified by the significant length of their
optical tubes that requires the azimutal axle to be as short as
possible.
The most important is to minimize static friction and to keep a dynamic friction that will help keeping the telescope in position in case of minor vibration.
You can use friction of steel against wood without using expensive teflon pads that are sometimes difficult to find. You can also use sealed ball bearings and add some friction.
The spider is the part holding
the secondary mirror in the middle of the tube. It
provides precise positionning of the secondary mirror on 3
rotation axis and 3 translation directions. It is the most complex part
of the telescope.
Drawings of the spider
The barillet orientates the
primary mirror on 2 rotation axis. It is more simple than the spider
but must be carefully designed because it supports the primary mirror
and must not damage it.

Drawings of the barillet
Try the hydraulic focussing system. When you start with a small budget, it is the cheapest solution and its performance exceeds a lot of capstan and gear systems.
I bought a 150 mm in diameter
mirror, focal length 750 mm, lambda/12 according to the manufacturer, a
secondary mirror sold for it, a 7 x 50 viewfinder and a 15 mm
orthoscopic eyepiece (50 times magnification with this focal length).
It is a compromise that allowed me to start with a powerful enough
telescope to avoid being desappointed.
From this equipment, I made 4 telescopes by reusing the optical parts of the previous one every time. The two first telescopes were not very stable, I took them apart to make the last one.
From this equipment, I made 4 telescopes by reusing the optical parts of the previous one every time. The two first telescopes were not very stable, I took them apart to make the last one.